2015年2月16日星期一

Rip and Convert DVD for Apple TV 3

It must be fantastic to watch your favorite DVDs on your Apple TV 3. This tip is about how to rip and convert DVD for Apple TV 3. It’s really easy to do the conversion, yet with powerful custom features. Read on for more.

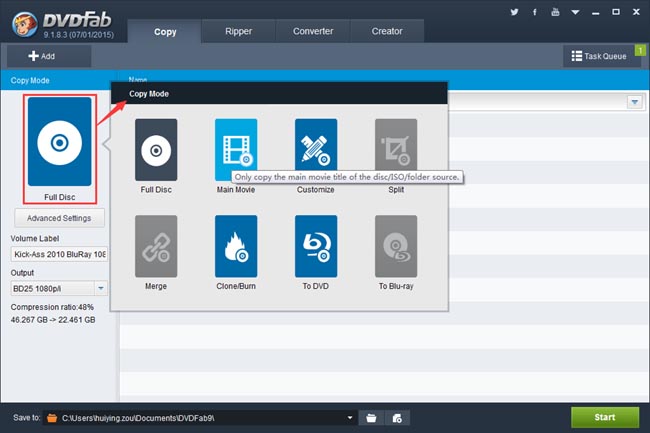
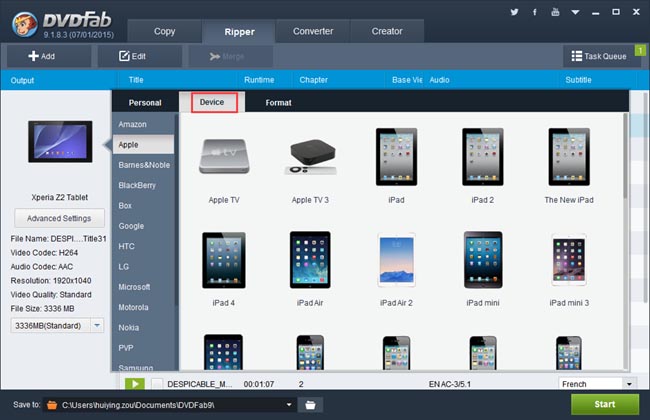
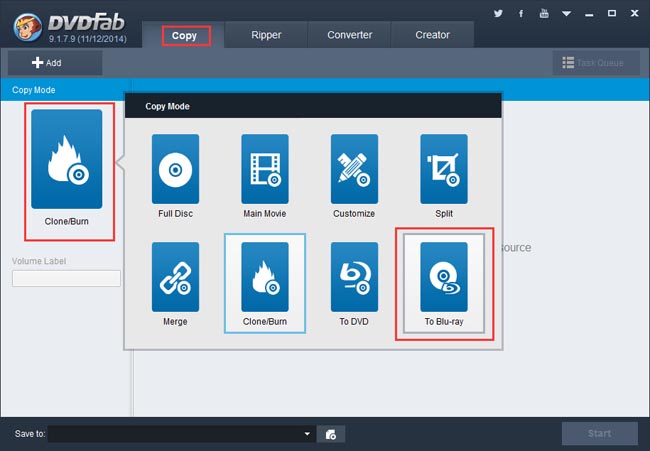
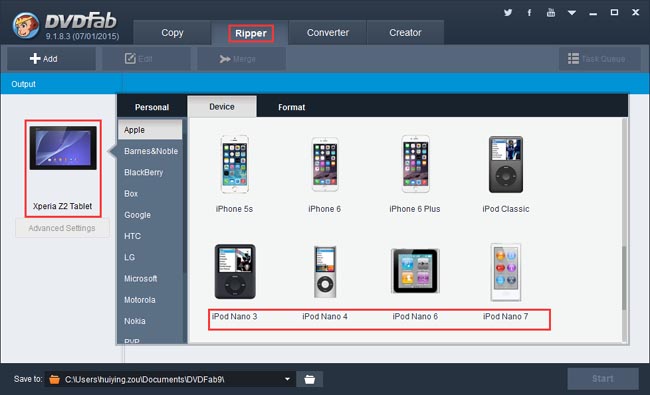
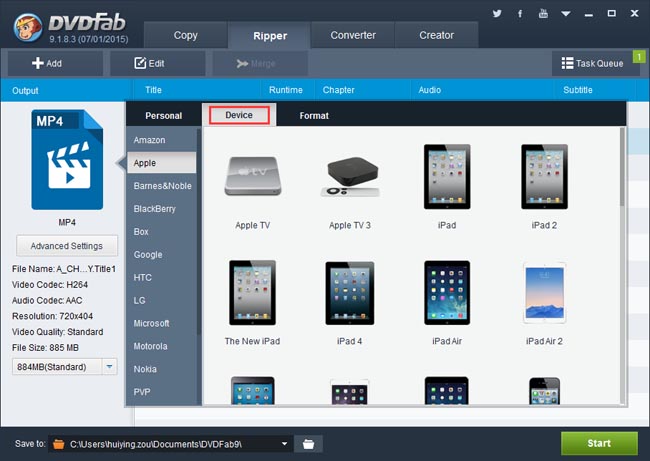
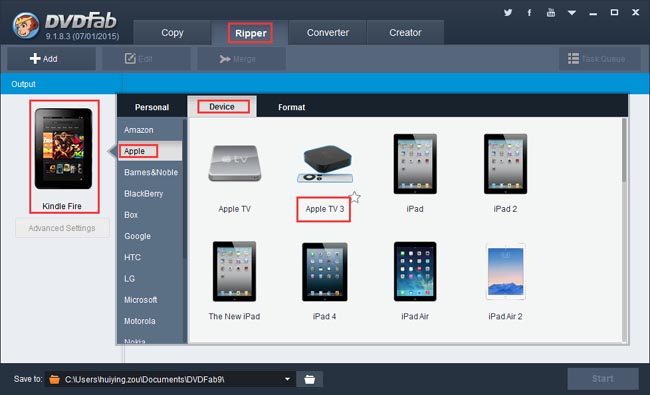
DVD to Apple TV 3 > Step 1: Run DVDFab -> Ripper, select the profile
Run DVDFab, go to Ripper option. Click the profile icon on the left panel, then go to Device -> Apple in the pop-up window to select Apple TV 3 as the profile for conversion.


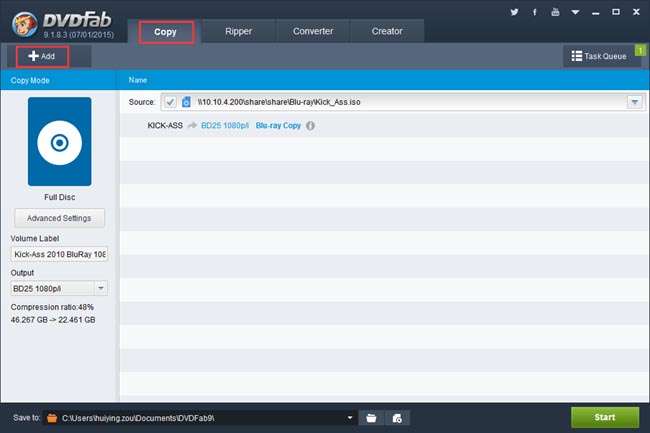
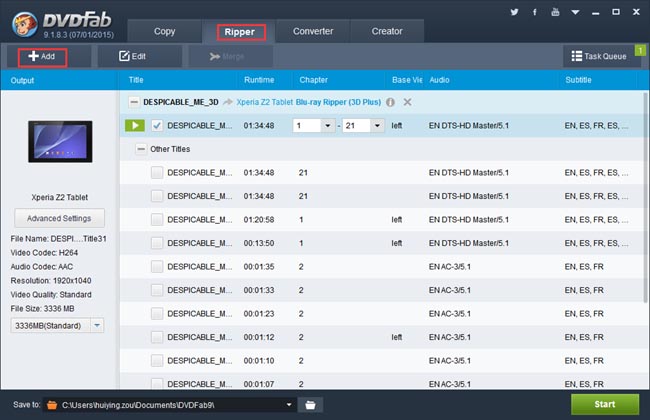
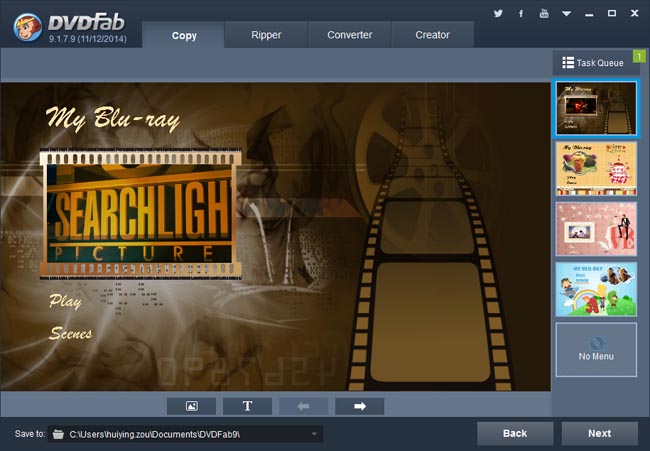
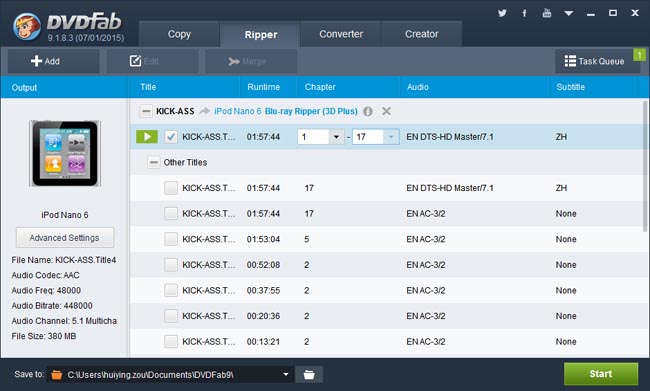
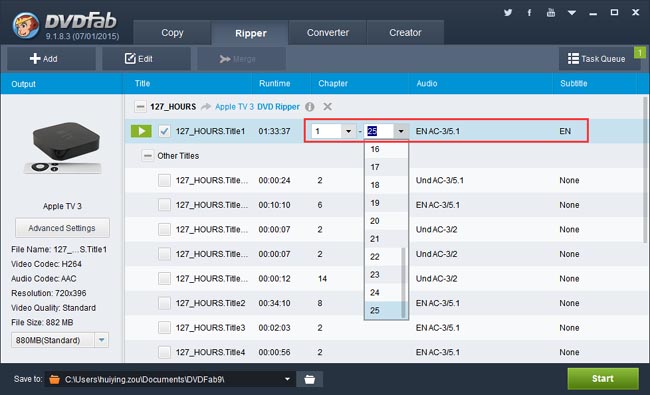
DVD to Apple TV 3 > Step 2: Load the source, then do some initial settings
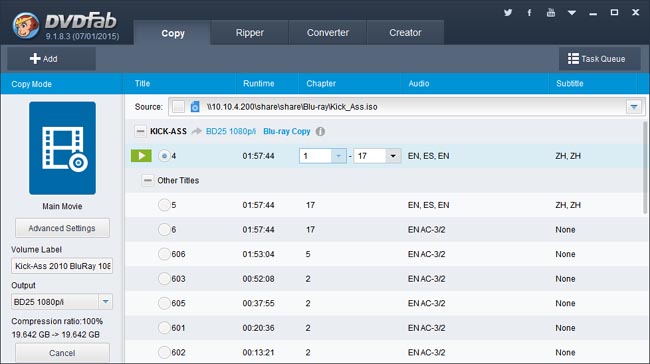
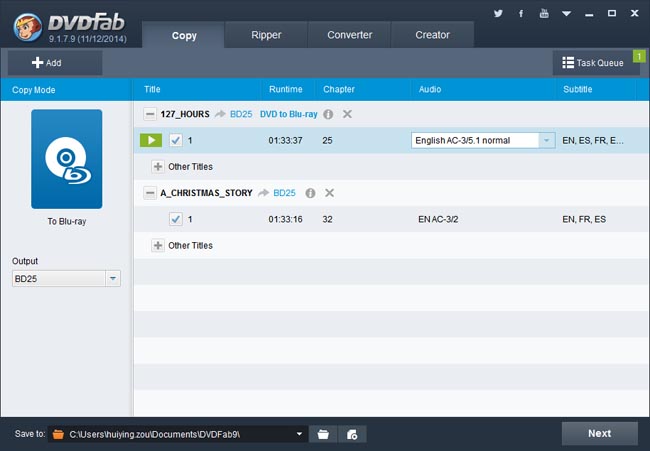
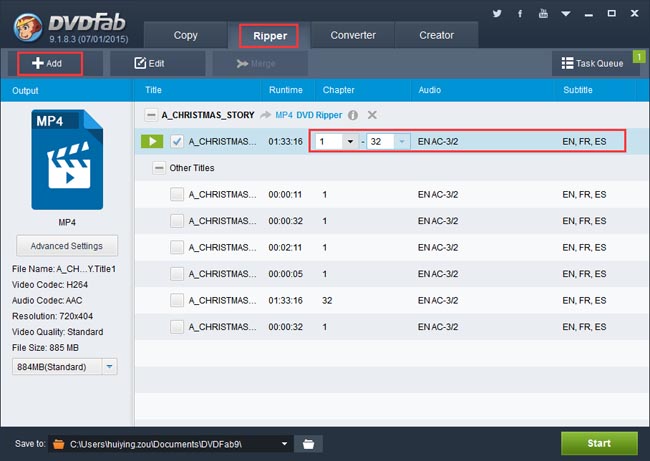
If you want to convert a DVD disc, just insert it into the DVD drive of/connected to your PC; if you want to convert a DVD digital file such as a DVD fileset or an image file, click Add button on the DVDFab interface to load it in. Seconds later the source movie will be in, with the longest movie title selected by default whose first/last chapter, audio and subtitles can be changed if you like.
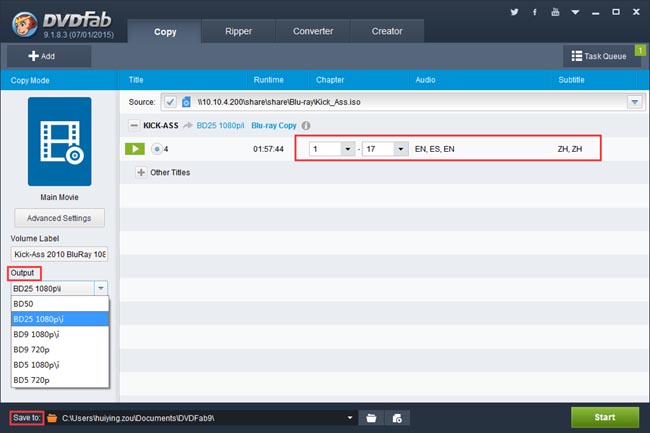
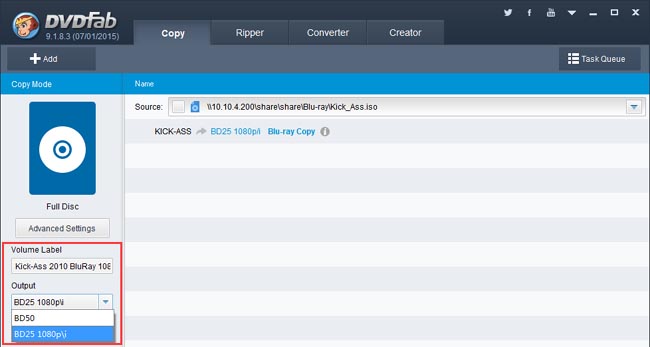
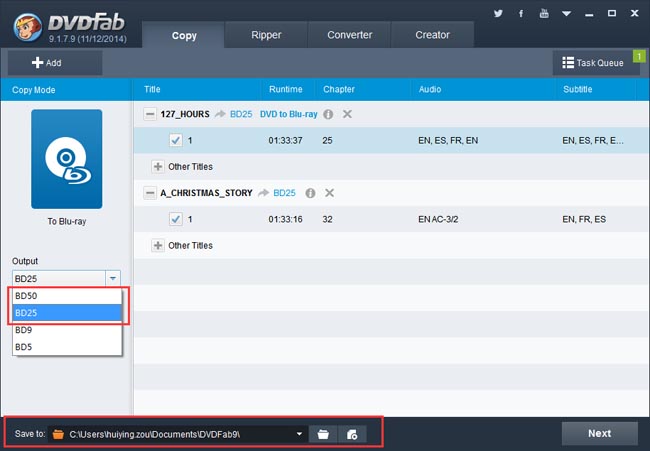
On the bottom of the left panel, there is a “File Size” pull-down menu, via which you can specify the output file size.
Then move to the “Save to” box to specify a storage path.


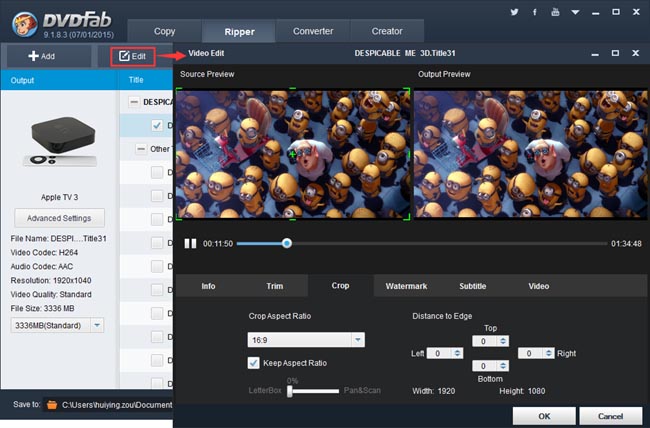
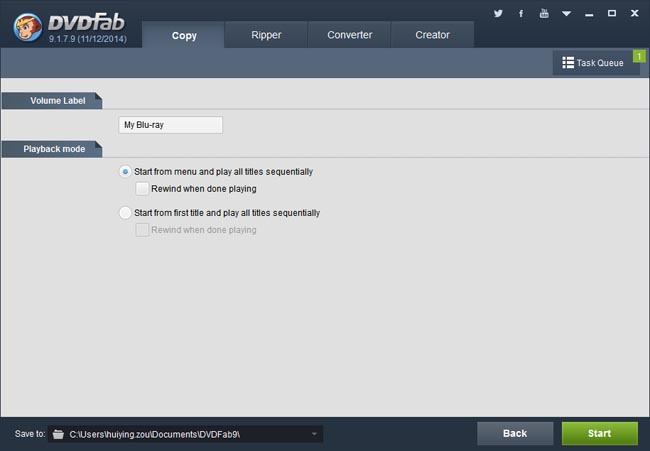
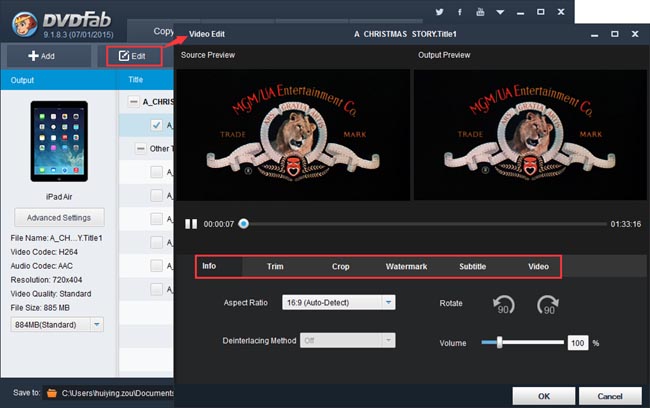
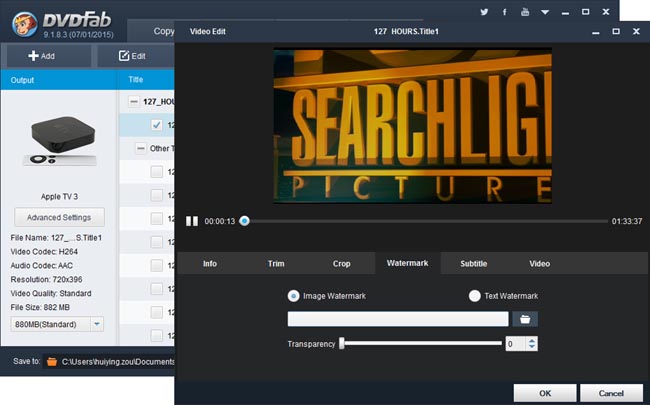
DVD to Apple TV 3 > Step 3: Edit video
OK. Now if you click Edit button on the top of the interface you will open the following Video Edit window, where you are able to change the volume, trim and crop the video, add watermark and load the external subtitles.


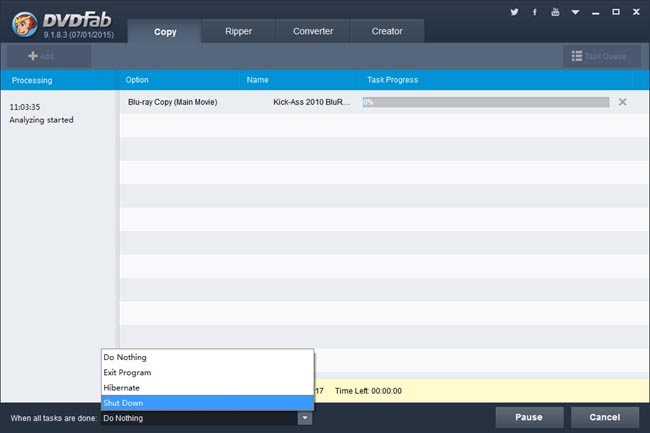
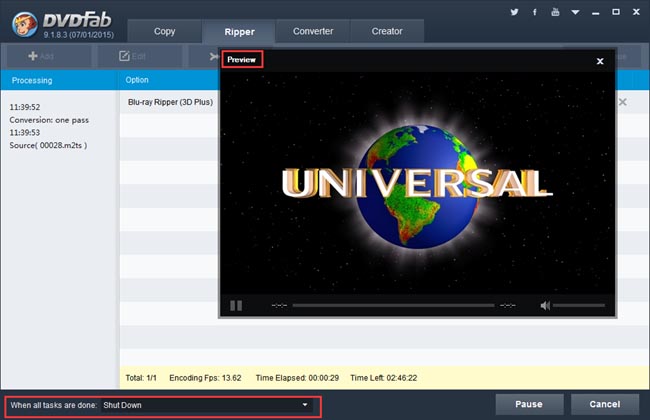
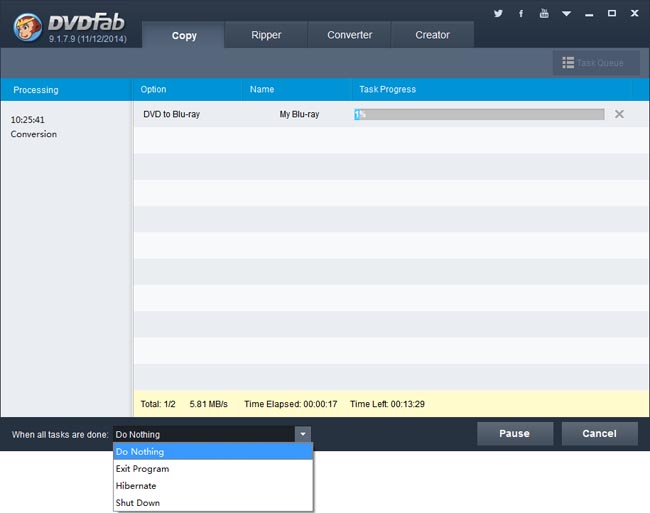
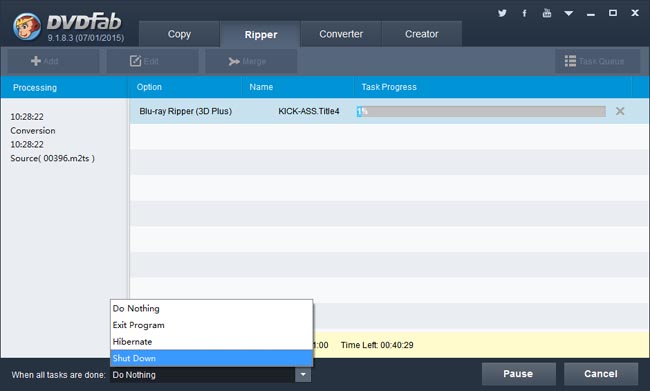
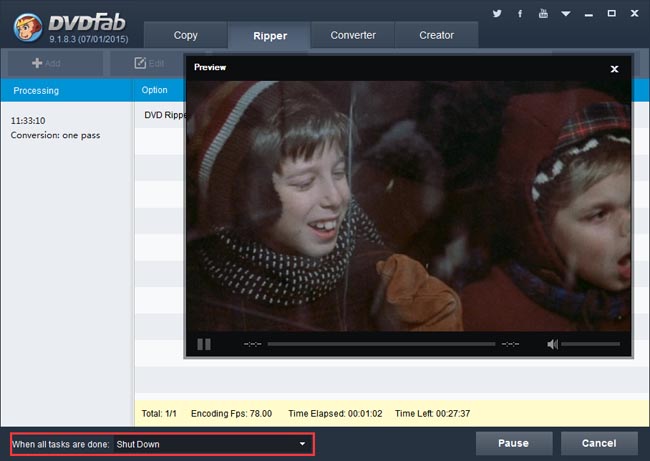
DVD to Apple TV 3 > Step 4: Start conversion process
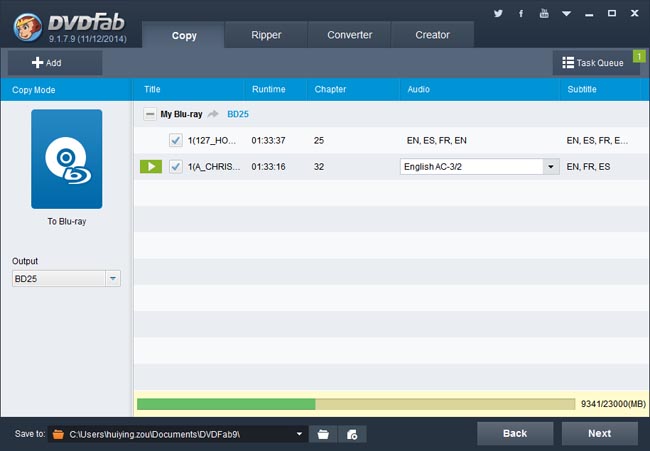
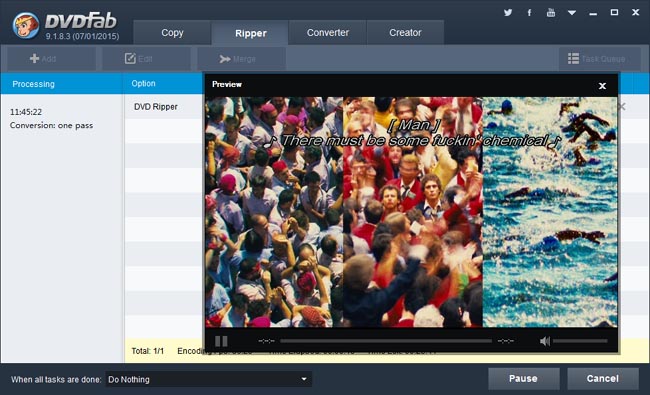
Now click Start button on the main interface to start the conversion process. During the process, you can view detailed progress info and even preview the progress in real time. You can also set your PC to shut down or hibernate when all tasks are done.


OK. That’s all there is to it. For more info about DVDFab DVD Ripper, please go to: www.dvdfab.cn/dvd-ripper.htm

2015年2月15日星期日

Blu-ray Backup – Using DVDFab Blu-ray Copy

DVDFab Blu-ray Copy is a very professional Blu-ray backup software. It can backup Blu-ray movies to digital files as Blu-ray folders or ISO image files. And it’s very easy to use with just a few steps as follows:

Step 1: Run DVDFab -> Copy, and load in the Blu-ray source
After download and install DVDFab on your PC, run it and go to Copy option. Now insert the Blu-ray disc you want to backup, or if the source is a Blu-ray folder or image file and you want to backup and convert it to another digital format (convert a movie folder to an image file, or vice versa), just click Add button to load it into DVDFab interface. Then you’ll see the movie is in one or two seconds later.


Step 2: Select a copy mode
Now navigate to the left panel to click the copy mode icon and bring about all supported copy modes by Blu-ray Copy, including Full Disc, Main Movie, Customize and Clone/Burn.


The first screenshot shows the default mode is Full Disc which will copy all the Blu-ray content. Here we’re choosing Main Movie to take a look, which is used to process only the longest movie title.


The first/last chapter, audio and subtitles of the title can be changed. Move to the left panel to choose BD50 or BD25 as the output size. Then go to the bottom to select a storage path for the output Blu-ray folder or image file.

Step 3: Start Blu-ray backup process
After all settings are OK, hit Start button to start the backup process. You can view detailed progress info in the process interface, and you can also set your PC to shut down or hibernate, or set DVDFab to exit, when all tasks are done.


OK. That’s all. For more information about this Blu-ray backup software, please go to: www.dvdfab.cn/blu-ray-copy.htm

Free Blu-ray Burner

DVDFab Blu-ray Copy can be used as a free Blu-ray burner within the 30-day trial period, and probably the most powerful free Blu-ray burning software, with multiple burning modes available. Now let’s take a glimpse at it.

1. Run DVDFab -> Copy, and load the Blu-ray source
After free download and installation of DVDFab, run it and go to Copy option. Then insert the Blu-ray disc being burnt into the Blu-ray drive connected to your PC, and DVDFab will load it in. If the Blu-ray source is saved as a local digital file, then click Add button on the main interface to find the file and load it. The default mode for Blu-ray Copy in this example is Main Movie mode, which will process the longest movie title only. And you can change the first/last chapter of the title to re-select the part for burning. The audio tracks and subtitles can also be changed.


2. Choose another mode if you want
DVDFab Blu-ray Copy has a Burn/Clone mode which can directly burn the source in 1:1 ratio without any settings or selection.


It will burn the source in 1:1 ratio, exactly as what it is, and you don’t need to do any settings.


The Full Disc mode will handle all the Blu-ray disc content. The additional feature is that you can freely choose the output as BD25 or BD50, and rename the Volume Label.


The last Customize mode then allows you to burn any titles of the source freely. Just try it out yourself.

3. Start burning
After you’ve selected a burning mode and made some settings if necessary, go back to the main interface. Navigate to the bottom “Save to” box to make sure the Blu-ray drive for burning has been selected. Then hit the Start button to start the burning process. And you’ll be asked to insert a compatible disc to start write process at some time (after the selected source content has been ripped completely) during the process, just insert a compatible blank BD.
OK. Leave the rest to DVDFab. More info about DVDFab Blu-ray Copy can be found at: www.dvdfab.cn/blu-ray-copy.htm

2015年2月13日星期五

Blu-ray Burner

DVDFab Blu-ray Copy can be used as a powerful Blu-ray burner. It can burn Blu-rays with many burning modes. This tip is about how to use this Blu-ray burning software to burn a Blu-ray easily and flexibly. Please follow me.

Step 1: Run DVDFab, choose Copy option, then load the Blu-ray source
After download and installation of DVDFab, run it and click the Copy option. Now insert the BD you want to burn into the Blu-ray drive connected to your PC and DVDFab will load it in one or two seconds later. If the source is a digital Blu-ray file, click Add button on DVDFab interface to load it then. The default copy mode in this tip is Main Movie. After the source is in, you can see the longest movie title being selected with audio tracks, subtitles and the first/last chapter changeable.


Step 2: Select a burning mode
If you don’t want to use the Main Movie mode, you can click the mode icon to bring about all supported modes. Let’s take Clone/Burn mode for example.


It will burn the source in 1:1 ratio, exactly as what it is, and you don’t need to do any settings.


If you want to burn a BD50 in a compressed way retaining all the disc content, just use “Full Disc” mode. Under this mode, you can choose the output as BD25. And you can also change the default volume label.


The “Customize” mode will allow you to burn any content as you like. And I’ll leave this for your exploration. Now go to the next step.

Step 3: Specify storage path and start burning
In the Save to box on the bottom of the interface, make sure to select the Blu-ray drive for burning the Blu-ray. Then click Start button to start conversion. During the process, you’ll be asked to insert a compatible disc to start the write process. Just do it. And leave the rest to DVDFab. Of course you can view detailed progress info. And you can also set your PC to shut down or hibernate when all tasks are done.
OK. That’s it. More info about DVDFab Blu-ray Copy can be found at: www.dvdfab.cn/blu-ray-copy.htm

2015年2月11日星期三

Convert Blu-ray for Apple TV 3

DVDFab Blu-ray Ripper can convert Blu-rays to specific videos compatible with various devices. This tip is about how to use it to convert a Blu-ray so that it can be played by Apple TV 3. This Blu-ray to Apple TV 3 conversion is easy and interesting. Follow me to the details.

Step 1: Run DVDFab -> Ripper and load the Blu-ray source
Run DVDFab after the download and installation. Go to the Ripper option. Then insert the BD into the Blu-ray drive connected to your PC and DVDFab will load it in. If the Blu-ray source is a digital file, just click Add button on the top of the interface to import it. After the Blu-ray movie is in, the longest movie title will be selected by default. You can change its first/last chapter, audio and subtitles if you like.

Step 2: Select Apple TV 3 as the profile
On the left panel of the interface, click the profile icon to open the profile library where all supported format/device profiles are included. Go to Device -> Apple to choose Apple TV 3 as the profile.


Step 3: Edit the video
OK. Now click Edit button on the main interface and a Video Edit window will open. Then you can go to change the volume, trim and crop the video, add watermark, load external subtitles, etc.


Step 4: Start conversion
Click Start button to start conversion if all settings are OK. During the process, you can view detailed progress info and preview the progress in real time if you like. If you don’t want to wait for the ending, just set your PC to shut down or hibernate when all tasks are done.


OK. Leave the rest to DVDFab now. More info about DVDFab Blu-ray Ripper can be found at: www.dvdfab.cn/blu-ray-ripper.htm

2015年2月10日星期二

Back up DVDs to a Blu-ray

If you have too many DVD files and you want to make them neat, or you want to put many DVD contents into one disc/file with original quality, you can use DVDFab DVD to Blu-ray Converter to back up many DVDs into one Blu-ray file or disc. Next let’s have a look at how to do this.

Step 1: Run DVDFab, Go to Copy Option, and Select “To Blu-ray”
After run DVDFab – Copy option, click the mode icon on the left panel to choose “To Blu-ray”. Now DVDFab DVD to Blu-ray has been enabled.


Step 2: Import the Source DVDs
If you happen to have many DVD drives, you can insert all the DVD discs you want to convert into the drives for DVDFab to load them. If not, you need to rip all the DVD contents first to your PC, then drag the backup files into the program. Seconds later, all the source contents will be in and the longest movie titles will be selected by default. You can choose other titles, set audio and subtitles and rearrange the first/end chapter of a title.


Go to the left panel to select BD25 or BD50 in the Output drop-down according to the output size you want. Move to the bottom “Save to” to specify a storage path for the output which could be a folder or an image file. If you want to burn the content into a physical Blu-ray disc, you just connect a Blu-ray drive to your PC and select the drive here.


Click Next button to confirm your selection.


Step 3: Create a Blu-ray Menu or Don’t
The above Next button will lead you to create and customize your favorite Blu-ray menu for the output Blu-ray. Many built-in templates are free for you to choose. You can also choose “No Menu” on the right panel and “Next” to skip this menu creation step.


Now name the volume label and set the playback mode in the following window.


Step 4: Conversion
After all settings have been done, hit Start button on the main interface to start conversion. During the process, all detailed progress info can be viewed. And the PC can be set to shut down or hibernate when all tasks are done, and the program can be set to exit when that moment comes.


OK. Leave the rest to DVDFab now.
For more info about DVDFab DVD to Blu-ray Converter, please go to: www.dvdfab.cn/dvd-to-blu-ray-converter.htm

Sound and Video DVD ripping

How worrying is to carry out a DVD rip process? What would it be a good idea for you to search for and what do you require to make an effective result? Here are a few tips that can be helpful. On the off chance that you are looking to turn into an expert DVD ripper then you will need to take in the fundamentals of the subject. Ripping and copying a DVD alludes to changing over the sound or feature information from a DVD configuration to an advanced copy on your hard plate. In this article you will take in the essentials of how to turn into a productive DVD ripper.
 
In the event that you utilize a feature ripper it will pack the video into other formats. In the event that you utilize a DVD audio ripper it will clamp the sound from the DVD into an arrangement, for example To totally rip and copy a DVD you will either require both a DVD audio ripper and a video ripper, or you will require a DVD ripper that does both the work. Not just are there DVD rippers to change over a DVD to an organization your PC can manage; however there is currently even a DVD ripper that permits you to put a DVD onto a video. This product will change over your DVD to a video that can be included to your playlist your feature iPod free of charge.
 
The rate which you rip DVD can work relies on upon a few components. One of the huge components is the drive speed. Case in point an 8x commute will have the ability of ripping the DVD 8 times speedier than the DVD will play. An alternate variable that will impact how quick your DVD ripper goes is processor speed. On the off chance that you have a moderate processor that will make it so the DVD ripper can’t stay aware of the drive and will result in a stoppage.
Sound and Video DVD ripping
Since a DVD ripper utilizes a great deal of processor and space it is essential that you keep your machine clear of garbage and keep it as lean and mean as could be allowed. You don’t need a pack of spyware, programming upgrades, mp3 players, amusements, applications, and so forth running out of sight as they could derail the procedure of the DVD sound ripper and the feature DVD ripper. It is likewise vital to have a quick machine that can deal with transformation of DVDs to your hard commute. A machine that has a 2 GHz processor ought to have the capacity to do the task well. Likewise having more than 40 GB of free space is prescribed as you would prefer not to spend an hour ripping your DVD just to find that your DVD ripper has used up space and must quit.
Since you have taken in the essentials of DVD ripping, and how it is essential to have a DVD ripper and a DVD sound ripper, you can now get the best DVD rippers to begin the ripping procedure.

2015年2月9日星期一

Rip and Convert Blu-ray to iPod Nano

DVDFab Blu-ray Ripper (3D Plus) can rip and convert Blu-ray to iPod Nano. If you occasionally have the need to rip your Blu-ray movie and listen to it using your iPod Navo, just use DVDFab Blu-ray Ripper (3D Plus). And better take the full advantage of it during the 30-day trial period when it’s free. Now please follow me to have a look at how to do this conversion. It’s very easy.

Step 1: Run DVDFab -> Ripper, choose a profile for your iPod Nano
Download and install DVDFab on your computer. Run it and go to Ripper option. On the left panel, click the profile icon to open the profile library where all supported profiles for various devices and formats are included. Go to Device -> Apple to choose the iPod Navo you’re using.


Step 2: Load the Blu-ray source
If you want to convert a BD, just insert it into the Blu-ray drive connected to your PC and DVDFab will load it in a couple of seconds later. If you want to convert a Blu-ray digital file, just click Add button on the main interface of DVDFab to load it, or drag and drop it into the program. After the source movie is in, you can see the longest movie title is selected by default with the first/last chapter, audio and subtitles changeable.


Step 3: Specify a storage path then start conversion
OK. Now specify a storage path in the “Save to” box on the bottom of the main interface, then click Start button to start conversion process. During the process, you can view detailed progress info and set your PC to shut down or hibernate or set the program to exit when all tasks are done.


Alright. Now leave the rest to DVDFab. More info about DVDFab Blu-ray Ripper (3D Plus) can be found at: www.dvdfab.cn/blu-ray-ripper.htm

2015年2月6日星期五

Universal Blu-ray Converter

DVDFab Blu-ray Ripper is a universal Blu-ray Converter which can convert Blu-rays to virtually all popular video/audio formats for playback on the mainstream devices. It is easy to use and allows you to customize the output effect freely. Now please follow me to have a look at how to use it to do Blu-ray conversion.

Step 1: Run DVDFab, load the Blu-ray source under Ripper option.
Start up DVDFab after downloading and installing it on your PC. Choose the Ripper option. Then insert the Blu-ray disc into the Blu-ray drive connected to your PC for DVDFab to load it. Or if the source is saved as a Blu-ray folder or an image file, click Add button on the DVDFab interface to load it. After the movie is in, you can see the longest movie title being selected with audio tracks, subtitles and first/last chapter changeable.


Step 2: Choose a format/device profile
Click the profile icon on the left panel to open the profile library which includes all supported video/audio/device profiles. Go to Format, then you can view the video/audio/3D format profiles and select one.


Go the Device, then you can find all supported devices here and select one.


Step 3: Edit output effect
For an output video, you can click Edit button on the main interface to open Video Edit window, where you can trim and crop the video, add watermark, change the volume, load external subtitles, etc.


Step 4: Start conversion process
Now go to the main interface to specify a storage path in the bottom “Save to” box, then hit Start button to start conversion. You can view detailed progress info and preview the progress in real time if you like. You can also set your PC to shut down or hibernate when all tasks are done so that you don’t need to wait for the process completed.


OK. That’s all. For more info about this Blu-ray converter, please go to: www.dvdfab.cn/blu-ray-riopper.htm

2015年2月4日星期三

Universal DVD Converter

DVDFab DVD Ripper is a universal DVD converter which can rip and convert DVDs to various videos or audio in different formats. Nearly all formats and devices are supported by DVDFab for the output files. And video effects can be customized freely. Now let’s have a look at how to use it.

Step 1: Run DVDFab, click Ripper option then load the source DVD
Download and install DVDFab, then run it. Go to the Ripper option. Insert the DVD disc into DVD drive, or click Add button on the DVDFab interface to load the digital DVD source. After the movie is in, the longest title will be selected by default. For a highlighted title, the first/last chapter, audio and subtitles can be changed.


Step 2: Choose a profile
Click the profile icon on the left panel to open the profile library, in which profiles for all supported formats and devices are included. Now let’s take a glimpse at the Format option, which includes a myriad of video/audio formats.


Then let’s go to Device option which covers various popular mobile and other devices.


Let’s use the “iPad Air” profile as the example here.

Step 3: Edit the video effect
Click Edit button on the main interface and you can trim and crop the video, add your personal watermark, change the volume, load external subtitles, etc.


Step 4: Start DVD conversion
Now go to specify a storage path in the “Save to” box at the bottom of the main interface, then click Start button to start conversion process. During the process, you can view the progress info, and even preview the progress in real time. You can also set your PC to shut down or hibernate when all tasks are done.


OK. Leave the rest to DVDFab now. More info about DVDFab DVD Ripper can be found at: www.dvdfab.cn/dvd-ripper.htm

Video to DVD Converter

DVDFab DVD Creator can be used as a video to DVD converter which can convert nearly all the popular format videos to DVD folders or image files or burn these videos into DVD discs. And multiple videos can be converted into one file or disc. That’s fantastic. It’s easy to use with just 4 steps as follows.

Step 1: Run DVDFab DVD Creator
Download and install DVDFab. Run it. Then go to the Creator option to choose DVD Creator as the creator mode by clicking the creator icon on the left panel.

Step 2: Load in the source videos or download them online directly
You can load in as many videos as you like for DVDFab to convert them into a DVD. Just click Add button, or drag and drop the videos into the program, to load the source.

You can also download videos online then use the downloaded videos as the source. Just click Download button and choose a video website DVDFab supports to download. After the download completed, all the videos will be automatically imported in as the source.

Step 3: Create a DVD Menu or not
Click Next button then you will come to the following DVD Menu creation interface. Here you can create and customize the DVD Menu for the output. If you don’t want any DVD menu playback experience, just choose “No Menu” on the right panel.

Step 4: Start video to DVD conversion
Now go back to the main interface to click Start button and the video to DVD conversion begins. During the process, you can view detailed progress info, and you can also set your PC to shut down or hibernate when all tasks are done.

OK. You can go to www.dvdfab.cn/dvd-creator.htm to learn more about DVDFab DVD Creator.

2015年2月2日星期一

Video to Blu-ray Converter

DVDFab Blu-ray Creator is a video to Blu-ray converter which can convert virtually all standard-format videos to Blu-ray digital files or burn them into Blu-ray discs. And more videos can be processed at the same time for one Blu-ray. Now let’s have a look at the detailed operation.

Step 1: Run DVDFab Blu-ray Creator
Run DVDFab and go to the Creator option. Then make sure the creator mode is selected as Blu-ray Creator. If not, click on the mode icon on the left panel to choose.


Step 2: Import the source videos, and set the output size/type
Click Add button to add the sources into DVDFab. Or drag these videos and drop them into the program. After one or two seconds they’ll be in, with audio tracks and subtitles changeable if there’re multiple options for audio/subtitles. Go to the left panel now to choose BD50 or BD25 for the output size. And move to the bottom “Save to” box to specify a storage path for the output Blu-ray folder or ISO image file, or select the Blu-ray drive connected to your PC for burning the videos into a blank Blu-ray disc.


Step 3: Create a Blu-ray menu or not
Click Next then you’ll come to the Blu-ray Menu creation interface where you can create and customize the Blu-ray Menu for the output. If you want no menu, just choose “No Menu” on the right panel. Then click Next.


Step 4: Start conversion
After all settings are OK, just hit the Start button on the main interface to start the video to Blu-ray conversion process. During the process, you can view detailed progress info, and you can also set your PC to shut down or hibernate, or set DVDFab to exit, when all tasks are done.


Alright. If you want to learn more about DVDFab Blu-ray Creator, please go to: www.dvdfab.cn/blu-ray-creator.htm

Video to Blu-ray Burner

DVDFab Blu-ray Creator is a video to Blu-ray burner which can convert and burn multiple videos into one Blu-ray disc or copy them into a digital file. And a Blu-ray menu is creatable and customizable. This video to Blu-ray burning software is darn easy to use. Let’s dive down to the detail.

Step 1: Run DVDFab and enable Blu-ray Creator
Run DVDFab and choose the Creator option. Click the Creator Mode icon on the left panel to choose the Creator Mode to be Blu-ray Creator.


Step 2: Load the source videos and do some initial settings
Click the Add button on the top left of the interface to load as many source videos as you want to process. After they’re in, you can change their audio tracks and subtitles if you like. Move to the left panel again, to specify the output size from BD50 and BD25. Then go to the bottom part to specify a storage path for the output. If you want to burn the video content into a blank BD, just choose the Blu-ray drive connected to your PC in the “Save to” box; if you want to copy the source into a Blu-ray folder or an ISO image file, just click corresponding icon to choose an output directory.


Step 3: Create and customize the Blu-ray Menu
Click Next button then you can create and customize a Blu-ray Menu for the output. If you don’t want any Blu-ray menu experience, just select “No Menu” on the right panel to skip this step.


Step 4: Start burning
Go to the main interface to click Start button, then the video to Blu-ray burning process begins. If you’ve set the output to be saved in a BD, then you’ll be asked to insert a compatible disc to start write process at some time after the Start button is triggered. Just insert the blank Blu-ray disc you prepared beforehand. And leave the rest to DVDFab. BTW, you can view detailed progress info and set your PC to shut down or hibernate when all tasks are done.


OK. That’s all. More info about DVDFab Blu-ray Creator can be found at: www.dvdfab.cn/blu-ray-creator.htm